Spotify How to Upload Music a Musician's Guide
- Dec 12, 2025
- 14 min read
So, you've finished your masterpiece and you're ready to get it on Spotify. This is a huge step, but the first thing to know is a little counterintuitive: you can't upload music directly to Spotify yourself.
You need to partner with a digital music distributor. Think of them as the bridge connecting your music to all the major streaming platforms, making sure your tracks get delivered correctly and, most importantly, ensuring you get paid for your streams.
Your Guide to Getting Music on Spotify
Breaking into the world's largest streaming service can feel like a maze, but for independent artists, it’s more achievable than ever. The whole journey, from a finished WAV file on your laptop to a live track ready for playlists, really boils down to a few key stages. This guide is your roadmap—we're going to demystify the entire process so you can launch with total confidence.
First things first, we’ll get your audio files and artwork looking and sounding professional. This is more than just making good music; it's about hitting specific technical specs so your release is presented perfectly, no matter where it's played.
The Core Release Journey
After your assets are prepped, it's time to navigate the crowded world of music distribution. Choosing the right distributor is a critical decision. They’re the ones handling everything from sending your music to Spotify to collecting your royalties. Each one—from TuneCore to DistroKid—has different fee structures, features, and levels of support, so finding the right fit for your career is essential.
Once your music is submitted and on its way, the final—and most crucial—step is to claim your Spotify for Artists profile. This is your command center. It's where you can:
Pitch your music directly to Spotify's influential editorial playlists.
Promote your release with cool visual tools like Canvas and targeted ads with Marquee.
Dig into listener data to actually understand your audience and see what's working.
This simple graphic breaks the whole thing down into three core phases to help you see the path ahead.
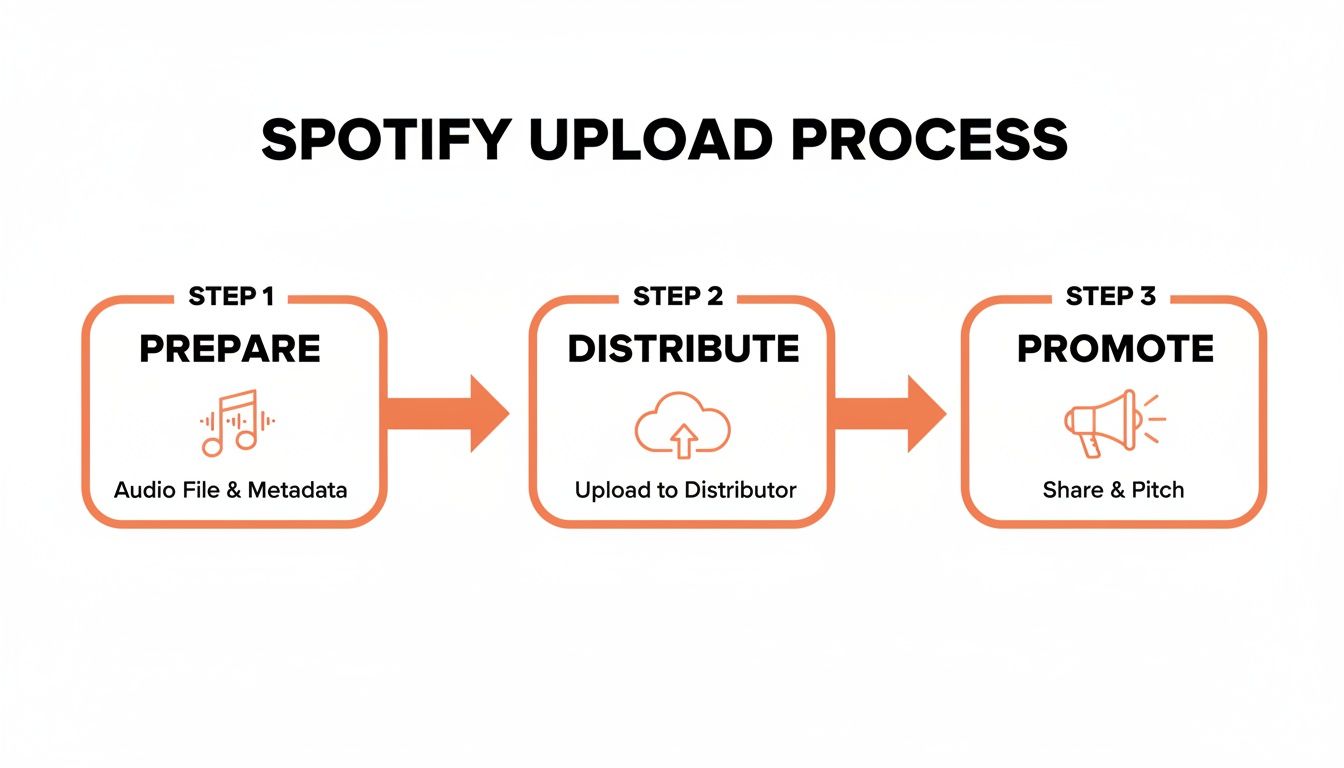
As you can see, the upload is just one piece of the puzzle. Solid preparation and smart promotion are what will really make or break your release. Let's get into the specifics of each stage.
To help you get a bird's-eye view, here's a quick breakdown of the entire process from start to finish.
Key Stages of a Spotify Release
Stage | Key Action | Primary Goal |
|---|---|---|
Preparation | Finalize audio master, create artwork, and gather metadata (ISRC/UPC codes). | Ensure all assets meet technical specifications and are ready for distribution. |
Distribution | Choose a distribution service and upload your prepared files and metadata. | Get your music delivered to Spotify and other streaming platforms efficiently. |
Verification | Claim and verify your Spotify for Artists profile as soon as your music is live. | Gain access to essential artist tools for promotion and data analysis. |
Promotion | Pitch to editorial playlists, set up pre-saves, and plan your marketing campaign. | Maximize initial streams and algorithm support from day one. |
Post-Release | Monitor streaming data, engage with your audience, and analyze performance. | Understand your release's impact and inform your strategy for the next one. |
Mastering each of these stages ensures your music not only gets on the platform but has the best possible shot at finding its audience and making a real impact.
Get Your Release Ready for the Big Leagues
Before you even think about hitting 'upload' on a distributor's site, you need to get your house in order. How you prepare your files and information is just as crucial as the music itself. This is the stuff that separates the pros from the amateurs, and getting it right is your pre-flight check for a smooth launch.
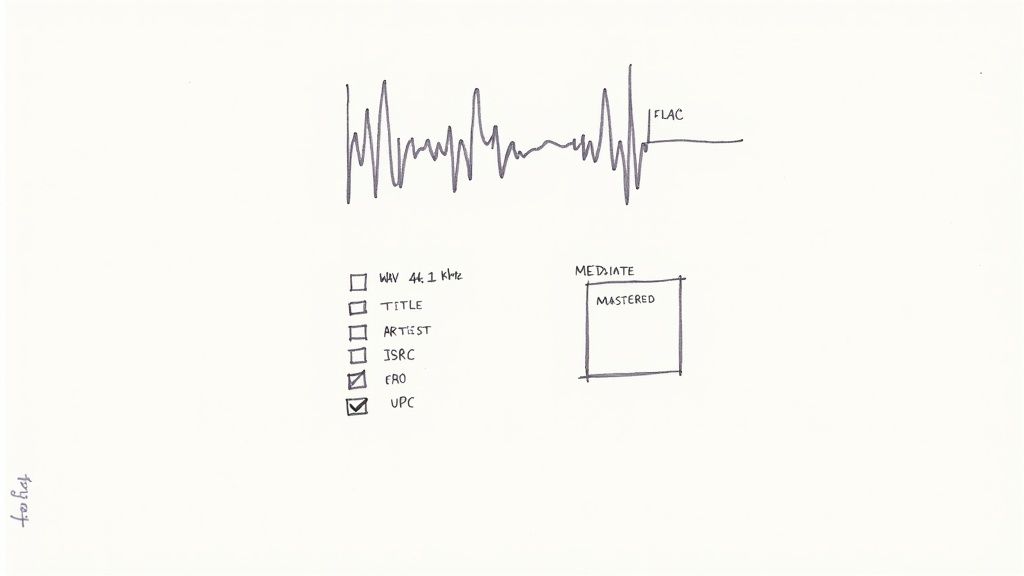
It all kicks off with your master audio file. That MP3 you sent to your friends for feedback? It’s great for that, but it has no place in a professional release. Spotify and other platforms need high-quality, uncompressed audio to give listeners the experience you intended.
Nailing Your Audio Specs
Your final master needs to be in either WAV or FLAC format. No exceptions. These are lossless file types, which means they keep every single bit of audio data from your master session. MP3s, on the other hand, compress your audio by literally throwing information away. Don't sabotage your sound before it even gets out the door.
Stick to these industry standards for the best results:
Bit Depth: 16-bit is the absolute minimum—that's standard CD quality. If your master is 24-bit, even better. Use that. It provides more dynamic range and detail.
Sample Rate: 44.1 kHz is the floor here, also CD quality. Don't go lower.
Format: Make sure the final file is a proper stereo track.
Handing over a low-quality file like a 128kbps MP3 is a rookie mistake. It will sound thin and washed out on the platform, undoing all the hard work you poured into the mix and master.
Your Track's Digital DNA: Metadata
Metadata is your song’s digital birth certificate. It’s all the text info that tells Spotify, your distributor, and the world who made this music and who should get paid for it. It seems boring, but getting this wrong can cause massive headaches down the road.
Before you go any further, triple-check this stuff:
Song Title: Is it formatted correctly? Think about features and remixes (e.g., "My Awesome Song (feat. Another Artist)").
Artist Name(s): Are all collaborators spelled correctly? Is everyone listed who should be?
Songwriter Credits: Have you credited every single person who contributed to writing the song, along with their specific role?
Think of metadata as the liner notes for the streaming era. Getting credits wrong isn't just unprofessional—it directly messes with royalty payments and can stop your song from being properly discovered.
Understanding Your Unique Codes (ISRC & UPC)
You'll come across two acronyms your distributor will assign to your release: ISRC and UPC. You don't have to go out and buy them, but you absolutely need to know what they are.
An ISRC (International Standard Recording Code) is like a unique fingerprint for one specific recording of a song. If you release an acoustic version or a remix later, each of those versions will get its own, new ISRC.
A UPC (Universal Product Code) is the barcode for the entire product—your single, EP, or album as a whole.
These codes are essential for tracking every stream and sale across every platform on the planet. This is how the system knows where to send the money. After you've got your high-quality audio, locked in the metadata, and created your artwork, you'll submit it all to your distributor. Their review usually takes 5-7 days before your music is cleared to go live. You can learn more about how artists actually get paid at artistpush.me.
Your First Impression: Cover Art
Finally, there's your cover art. In a sea of new music, this is the first thing that will catch someone's eye. Don't slack on it.
Spotify requires a perfectly square, high-quality image. The gold standard is 3000x3000 pixels in JPEG format. This ensures your artwork looks crisp and professional whether it's on a massive TV screen or a tiny smartphone display.
Picking your music distributor is a big deal—think of it as choosing your most important business partner. They're the ones who take your finished masterpiece and get it onto Spotify, Apple Music, and all the other places people listen to music. With so many options out there, all screaming for your attention, it's easy to get analysis paralysis.
The whole decision really comes down to one thing: how you pay. Most distributors fall into two camps. You've got services like DistroKid that charge an annual subscription, and then you have others like CD Baby that work on a one-time fee for each release. Neither is flat-out better; the right fit depends entirely on your game plan as an artist.
Annual Subscriptions vs. One-Time Fees
Are you planning to drop a new single every month? If you're constantly creating and releasing, a subscription model just makes sense financially. You pay one flat fee for the year and can upload as much music as you want without getting nickel-and-dimed for every track. It’s perfect for artists who want to stay consistent and experiment without worrying about costs piling up.
But what if you're the type to spend a couple of years perfecting an album? In that case, a one-time fee is probably more your speed. You pay once to get the music up, and it stays there forever—no recurring charges hanging over your head. This is the ideal route for artists working on larger, less frequent projects.
Getting your music out there is just the first step. You need to see if your strategy is actually connecting with listeners.
Tools that give you this kind of data are essential. They show you what's working so you can double down on your efforts and see real growth.
Key Takeaway: Your release frequency is the biggest factor. Releasing a lot? Go with a subscription. Releasing sporadically? A one-time fee is likely your best bet.
Comparing the Top Music Distributors
Beyond the payment structure, you've got to look at the nitty-gritty details. Let's break down some of the most popular distributors to help you figure out how to distribute music and get heard by millions.
Every artist's journey is unique, and the right distributor can feel like finding the perfect collaborator. The table below breaks down some of the key players to help you see which one might align best with your goals.
Distributor | Pricing Model | Royalty Cut | Best For |
|---|---|---|---|
DistroKid | Annual Subscription | 0% | Prolific artists releasing music frequently. |
TuneCore | Annual Subscription | 0% | Artists who want publishing admin and detailed analytics. |
CD Baby | One-Time Fee Per Release | 9% | Artists releasing infrequently or who need physical distribution. |
Each of these services has carved out its own niche in the industry. Your job is to find the one that fits your specific needs, not just the one with the flashiest marketing.
Here’s a more personal look at what sets them apart:
DistroKid: Hands down the favorite for artists who want things fast and simple. You can get your music live in just a few days, and they let you keep 100% of your royalties, which is huge. The catch? A lot of the really useful features, like YouTube Content ID or making sure your music stays up if you stop paying, are paid add-ons.
TuneCore: If you're serious about the business side of things, TuneCore is a powerhouse. They offer a much deeper set of services, including publishing administration to help you collect all the songwriter royalties you're owed. Their analytics are also top-notch, though their pricing tiers can feel a bit more complicated than DistroKid’s simple setup.
CD Baby: These guys are the OGs of indie distribution. Their biggest strength is the one-time fee model and their support for physical distribution—if you’re pressing vinyl or CDs, they’re a great partner. The main thing to remember is they take a 9% commission on your digital earnings, which can add up over time.
As an independent artist, you have to watch every penny. For example, DistroKid's $22.99 yearly plan for unlimited uploads also gives you access to listener data. Knowing who your fans are and where they live is gold when you're trying to reach some of Spotify's 276 million paying fans.
At the end of the day, the best distributor is the one that fits your budget, your release schedule, and your long-term vision. Read the fine print, weigh the pros and cons, and choose a partner you can trust to help you grow.
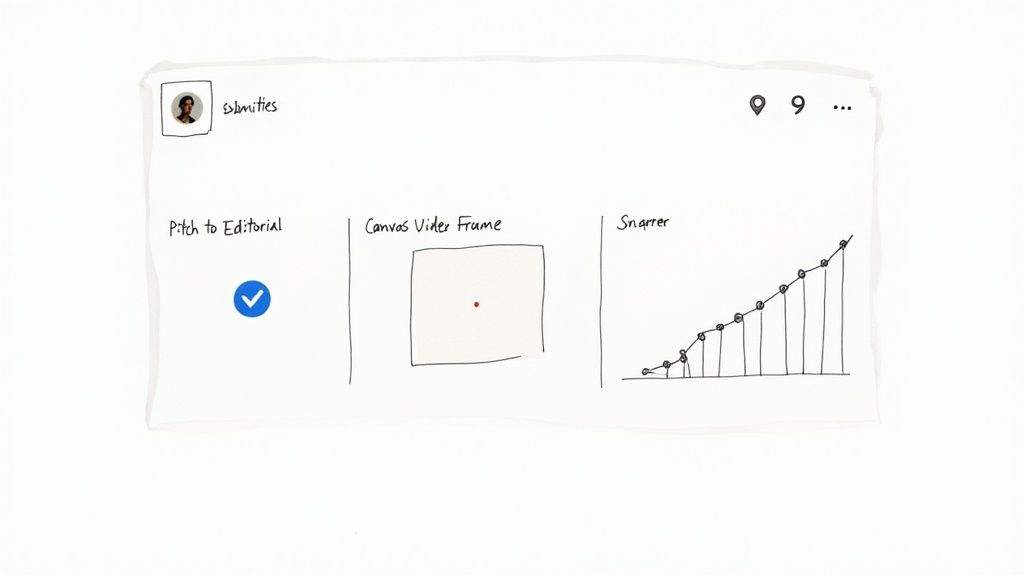
Once your distributor pushes your music live, the real work on Spotify begins. The very next thing you have to do is claim your Spotify for Artists profile. This isn't just about getting that slick blue checkmark; think of it as your mission control for everything you do on the platform.
Getting your profile unlocks the dashboard where all the magic happens. You can write a compelling artist bio, upload fresh promo photos, and even add those mesmerizing looping Canvas videos that catch a listener's eye. More importantly, it gives you a treasure trove of data on who's listening, where they are in the world, and how they found you.
Getting Verified and Pitch-Ready
The verification process itself is pretty painless. As soon as your distributor processes your first release, head over to the Spotify for Artists website and request access. They'll ask a couple of quick questions to make sure you're the real deal, and once you're approved, that coveted blue checkmark appears.
That little badge does more than just build trust with fans. It unlocks the single most powerful promotional tool on Spotify: the editorial playlist submission form. This is your direct line to the people curating massive playlists like New Music Friday, Lorem, and Chill Tracks.
Crafting a Pitch That Actually Gets Read
Submitting your music for playlist consideration is an art. You need to get your track in at least seven days before release day, but I always tell artists to aim for two or even three weeks out. This gives the editors enough time to actually listen and consider your song among the thousands they get hit with every single day.
When you fill out that submission form, be authentic. This is your one chance to tell the story behind your track.
Genre and Mood: Don't just pick what you think is popular. Select up to three genres, subgenres, and moods that genuinely fit your song. Is it "dream pop" with a "melancholic" and "ethereal" vibe? Get specific.
The Story: This is where you connect. You’ve got 500 characters to explain what makes this song special. Was it inspired by a specific moment? Does it have a unique instrument or a weird recording story? Share the human element.
Getting a placement is tough—acceptance rates hover around a challenging 1-2%—but landing one can send your plays into the stratosphere.
Your pitch is more than just data. It’s your elevator pitch to a real person who loves music as much as you do. Make it personal, passionate, and professional.
Supercharge Your Submission with a Little Help
Staring at a blank pitch box? This is where technology can give you a serious leg up. Tools like the AI pitch generator from artist.tools can analyze your track's details and marketing plans to help you build a compelling narrative. It's been trained on hundreds of successful pitches, so it knows what kind of language grabs an editor's attention.
Beyond the pitch, your Spotify for Artists profile is a living, breathing part of your career. Use it to update your bio regularly, announce tour dates with the "Artist Pick" feature, and dig into your listener data to plan your next move. For a deeper look, check out our guide on 7 essential Spotify for Artists tools. This isn't just about uploading music; it's about building a career.
Advanced Strategies for Promotion and Protection
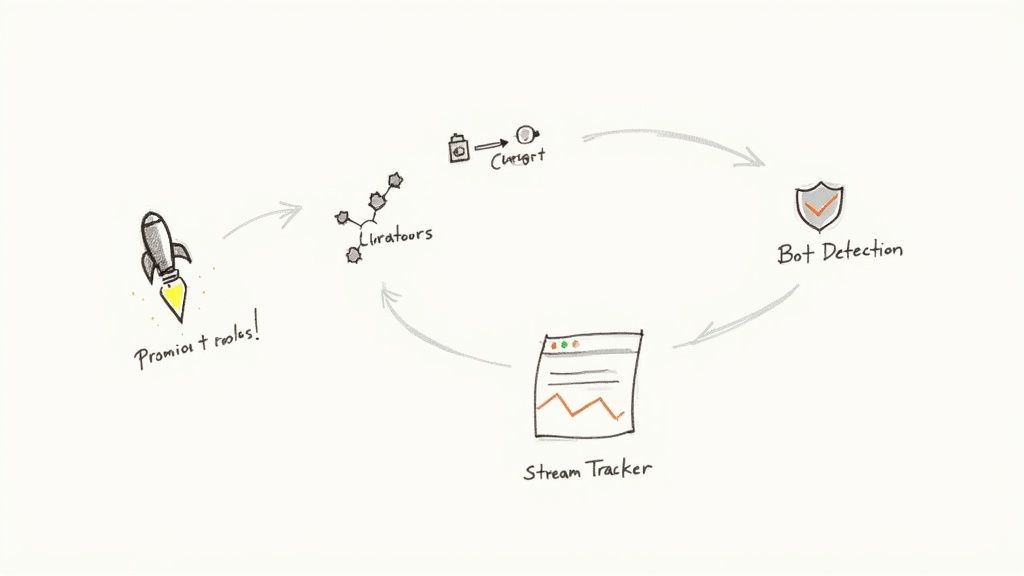
Getting your music onto Spotify is really just the first step. The real work begins now—building momentum, getting your music heard, and making sure all that effort is protected. This is where you move past the basics and start thinking like a pro.
One of the smartest things you can do right away is launch a pre-save campaign. It’s a simple concept: you get your fans to save your track to their libraries before it's officially out. When release day hits, that built-in activity creates a huge spike in first-day streams and saves. This is a massive signal to Spotify's algorithm that people care about your song, which can be the difference-maker. Most distributors have tools for this built right in, letting you turn your existing audience into a launchpad.
Finding Your Niche with Independent Playlists
We all dream of landing on a big editorial playlist, but the truth is, the independent playlist world is where most artists build a real, lasting fanbase. These lists are usually run by passionate music fans who’ve built a super-engaged, genre-specific community. A spot on one of these can be far more powerful than a brief appearance on a massive, generic playlist where your track gets lost in the noise.
But you can't just spam every curator out there. You need to be strategic.
Find Your Vibe: Look for playlists that perfectly match your sound. Sending a folk song to a techno curator is a waste of everyone's time.
Engagement Over Numbers: A playlist with 5,000 dedicated followers who actually listen is way better than one with 50,000 passive ones.
Keep it Legit: Make sure the playlist has real, organic growth. You don't want to get mixed up with lists propped up by fake followers or bots.
This is exactly what tools like the playlist search on artist.tools are for. You can filter by genre, mood, and size, and even get your hands on curator contact info. It makes your outreach so much more efficient and, more importantly, effective.
Protecting Your Streams and Royalties
Here’s the unfortunate reality: as your music starts to get traction, you become a target for fraud. Artificial streams, usually from bots, can wreck your analytics, steal from the royalty pool, and even get your music booted from Spotify. It's a serious problem, and every artist needs to be on high alert.
Spotify doesn't mess around with artificial streaming. Keeping your data clean isn't just a good idea—it's essential for staying in good standing with the platform and making sure you get paid what you've rightfully earned.
This is where you have to be proactive. Using a bot detection tool, like the one we've built into artist.tools, helps you spot shady activity before it becomes a problem. It scans playlists for red flags like unnatural growth, so you can avoid placements that could do more harm than good. If you really want to get into the weeds on this, our guide on unmasking Spotify fake streams and protecting your music is a must-read.
Finally, having a good stream tracker gives you a real-time look at what's happening with your music. You can see which playlists are actually driving listeners, helping you figure out what's working and which curators are truly supporting you. This data turns your promotion from a guessing game into a calculated strategy for real, sustainable growth.
Your Spotify Upload Questions Answered
Let's be real, getting your music out into the world can feel like navigating a maze. There are a lot of moving parts, and it's easy to get turned around. I've been there. So, let's cut through the noise and get straight to the answers for the most common questions artists have when uploading to Spotify.
First up: how long does it actually take for a track to appear on Spotify? While some distributors might promise lightning-fast turnarounds, it's always smarter to give yourself some breathing room. I'd recommend planning for at least one to two weeks. This buffer gives your distributor enough time to check your files and metadata, send everything over to Spotify, and for Spotify to get it all processed and live on their end.
Then there's the big question: how do you get paid? Your distributor is the one who collects royalties from Spotify on your behalf. They'll then pay you based on their own schedule, which is usually monthly or quarterly. The per-stream payout is never a fixed number; it changes based on where your listeners are, whether they have a Premium subscription, and other factors. Keeping a close eye on your distributor's dashboard is key to understanding your earnings.
Handling Edits and Takedowns
So, you've just dropped a new single and you spot a typo in the title. Don't panic. Or maybe you've decided a track just isn't right for your catalog anymore.
For small fixes like typos or metadata corrections, you can usually just submit an update request right through your distributor's website. They'll handle sending the corrected info over to Spotify.
If you need to pull a track down entirely, the process is pretty much the same. You'll put in a takedown request with your distributor, telling them which platforms to remove it from. Just know this isn't an instant process—it can take a few days for the track to disappear from all services.
Key Insight: I can't stress this enough: always give yourself a generous timeline. Rushing a release is the fastest way to make mistakes and add a ton of unnecessary stress. A good rule of thumb is to plan your release at least three to four weeks out. This gives you plenty of time for a smooth rollout.
Can You Switch Distributors?
Absolutely. Artists move their catalogs between distributors all the time. But—and this is a big but—you have to do it carefully if you want to keep your stream counts and all those hard-earned playlist placements.
The secret sauce is using the exact same ISRC codes and original audio files when you re-upload with your new distributor. This is how Spotify knows it's the same song. Here’s a tried-and-true method for making the switch:
Upload your entire back catalog to the new distributor while it's still live on the old one. Don't take anything down yet!
Make sure you set the release dates on the new platform to match the original release dates.
Once you've confirmed your music is live and looks correct through the new distributor, then you can go back and issue takedown requests with your old one.
Following these steps can create a seamless transition, so your listeners won't even notice a change. It's always a good idea to check the specific guidelines from both your old and new distributors, as their processes might vary slightly.
Ready to really own your Spotify strategy? With tools for bot detection, deep playlist research, and detailed royalty tracking, artist.tools provides the critical data you need to protect your music and grow your career. See everything you can do at https://artist.tools.
Comments