How to Upload My Music to Spotify A Modern Artist's Guide
- Feb 10
- 16 min read
So, you’re ready to get your music on Spotify. Before you even start thinking about release dates and marketing plans, there are two fundamental things you have to get right: your audio files and your cover art.
You can't just upload files directly from your desktop to Spotify. Instead, you'll work with a digital music distributor—they’re the essential go-between that packages and delivers your music to streaming platforms. But they won't accept just anything. Getting your assets in order first is non-negotiable, and it's the first real step in a professional release.
Your Essential Pre-Release Game Plan
Think of this part as laying the foundation. If your audio is poorly exported or your artwork is blurry, your distributor will kick it back, causing delays and a lot of frustration. Nailing these details ensures your music looks and sounds just as polished as the major label artists you're sharing the platform with.
Perfecting Your Audio Files
Spotify is all about a high-quality, seamless listening experience, and that starts with the files you submit. That low-quality MP3 you quickly bounced from your DAW? It’s not going to fly.
Your distributor will need a lossless audio format. The two you'll encounter most are:
WAV (Waveform Audio File): This is the king. It's an uncompressed format, meaning it's a perfect, data-rich copy of your final master. It’s the undisputed industry standard for quality.
FLAC (Free Lossless Audio Codec): FLAC is also a lossless format, but it’s compressed to create a smaller file size without sacrificing a single bit of audio data. Some distributors prefer it because it’s a bit more efficient to handle.
Beyond the file type, the technical specs have to be exact. You’ll want to export your master at a 16-bit depth and a 44.1 kHz sample rate. While you might have worked in 24-bit during production, 16-bit/44.1 kHz is the standard for CD-quality streaming and is precisely what Spotify requires. Getting this right prevents any weird conversion errors that could make your track sound worse than it should.
Designing Scroll-Stopping Cover Art
In a world of infinite scrolling, your cover art is your first, and maybe only, chance to grab someone's attention. A powerful image can be the difference between a listener skipping right past your song or tapping to see what it's all about. As you’d expect, Spotify's artwork requirements are just as strict as their audio specs.
Your artwork isn’t just a formality; it’s your digital billboard. It needs to pop on a tiny phone screen, tell a story about your music, and meet some very specific technical rules to even make it through the door.
To make sure your artwork gets approved without a headache, follow these guidelines to the letter:
Pixel Dimensions: Your image must be a perfect square and at least 3000 x 3000 pixels. This high resolution guarantees it looks crisp and professional everywhere, from a big TV screen to a small mobile widget.
File Format: Stick with JPEG or PNG. These are the standard formats that give you the best balance of image quality and manageable file size.
Color Space: Always use the RGB color space. This is the standard for all digital screens. If you accidentally use CMYK (which is for print), your colors will look dull, washed-out, and just plain wrong when they show up on Spotify.
Content Restrictions: Keep it clean and professional. Your artwork cannot have blurry or pixelated images, website addresses, your @socialmedia handles, or anything explicit. The focus should be purely on the art itself.
Choosing Your Distributor to Get on Spotify
So, your master tracks are polished and your cover art is ready. The next big move is picking your digital music distributor. You can't just upload your tracks directly to Spotify—you need a certified partner to bridge the gap between your music and the platform.
This is a step where a lot of independent artists get tripped up. You've got names like DistroKid, TuneCore, and CD Baby floating around, and on the surface, they all look like they do the same thing. But the differences in their fee structures, royalty splits, and extra services can seriously shape your career and bank account down the road.
Annual Subscriptions vs. One-Time Fees
The biggest fork in the road when choosing a distributor is usually how they charge you. This isn't just a minor detail; it's a decision that affects how you'll manage your music catalog for years.
Annual Subscription (e.g., DistroKid, TuneCore): You pay a yearly fee to keep your music live on streaming platforms. This is often a no-brainer for prolific artists who are constantly releasing new music—think multiple singles, an EP, and an album within a year. The main catch? If you stop paying that annual fee, your music comes down.
One-Time Fee (e.g., CD Baby): With this model, you pay a single, upfront fee for each release. Once it's paid, your music stays on Spotify and other stores forever, with no recurring costs. This is perfect for artists who release music less frequently and want the peace of mind that their catalog is secure without another subscription to worry about.
Think honestly about your release schedule. If you're dropping a new song every month, an annual subscription is almost always going to be cheaper. But if you’re putting out a passion-project album every couple of years, a one-time fee will save you from a lifetime of payments.
This simple flowchart helps you see if your key assets are actually ready for the distribution process.
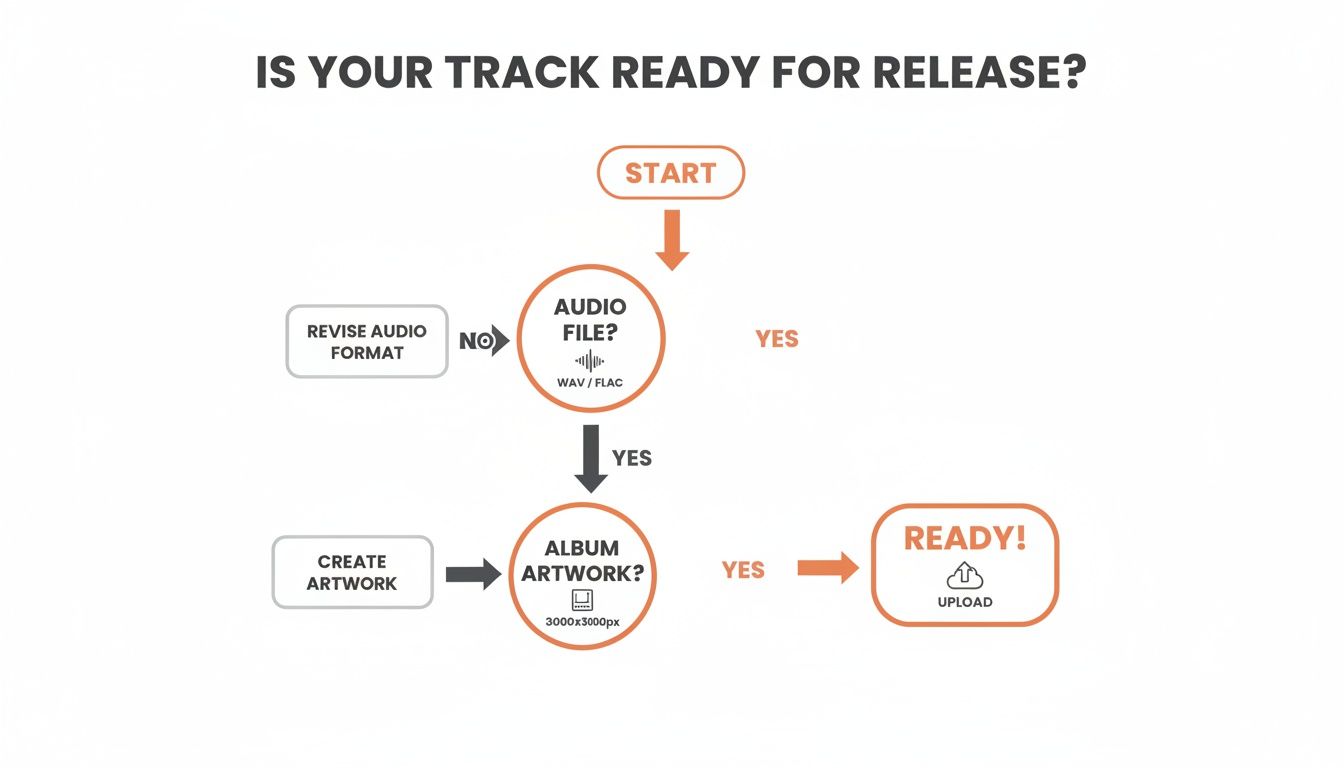
As you can see, having your audio and artwork files meet the specific technical requirements is the absolute foundation before you even start comparing distributors.
Looking Beyond the Basic Fees
It's easy to get tunnel vision on the upfront cost, but the real value is in the details. The royalty commission is a massive one. Some services, like DistroKid, are famous for letting artists keep 100% of their royalties. Others, like CD Baby, take a small cut (around 9%) of your streaming revenue in exchange for their one-time fee structure.
Choosing a distributor isn't just a logistical step; it's a business partnership. The right choice aligns with your release frequency, financial situation, and long-term career goals. Don't just pick the cheapest option—pick the smartest one for you.
You also need to weigh the value of the extra services they offer, which can unlock new ways to make money:
YouTube Content ID: This service automatically scans YouTube for videos using your music and lets you collect ad revenue from them. Most major distributors offer this, sometimes for an extra fee or a larger commission split on that specific income.
Sync Licensing: Some distributors have dedicated teams that pitch your music for use in TV shows, movies, and commercials. It's a long shot, but it can be incredibly lucrative if it happens.
Detailed Analytics: The quality of your sales and streaming reports can vary wildly. A good distributor gives you clear, easy-to-digest data so you can see exactly where your music is gaining traction.
Spotify is a beast, currently hosting over 100 million songs with around 106,000 new tracks being uploaded across all major DSPs every single day. Your distributor is your ticket in.
To help you sift through the noise, we've put together a quick comparison of some of the top players.
Top Music Distributor Comparison
This table gives a side-by-side look at the features, pricing, and royalty splits for popular music distributors to help you choose the right one for your needs.
Distributor | Pricing Model | Royalty Split | Key Features |
|---|---|---|---|
DistroKid | Annual Subscription (starts at $22.99/year) | 100% to Artist | Unlimited uploads, fast delivery, optional YouTube Content ID & Cover Song Licensing |
TuneCore | Annual Subscription (starts at $14.99/year) | 100% to Artist | Unlimited uploads, publishing administration, detailed analytics |
CD Baby | One-time Fee (starts at $9.99/single) | 91% to Artist | Music stays up forever, physical distribution, sync licensing, publishing admin |
Amuse | Free & Subscription Tiers | 100% to Artist | Free option available, offers artist advances, app-based submission |
Ultimately, there isn't one "best" distributor—only the one that’s best for you.
For a much deeper dive into how these platforms stack up, check out our full guide on how to distribute music and get heard. It’ll give you everything you need to make a final, confident decision on the partner who will get your music onto Spotify.
Getting Your Song Credits and Metadata Right
Once you've picked your distributor, it's time to dive into the data. The information you attach to your song—its metadata—is just as critical as the master audio file itself. Think of it as your track’s digital passport. Without it, your music can't travel, get discovered by new fans, or, most importantly, get you paid.
This isn't just about typing in a song title and hitting upload. We're talking about songwriter splits, publisher info, and all the nitty-gritty details that make the industry's wheels turn. Getting this wrong at the start can cause massive headaches and lost revenue later. It's the boring but essential admin that separates the pros from the hobbyists.
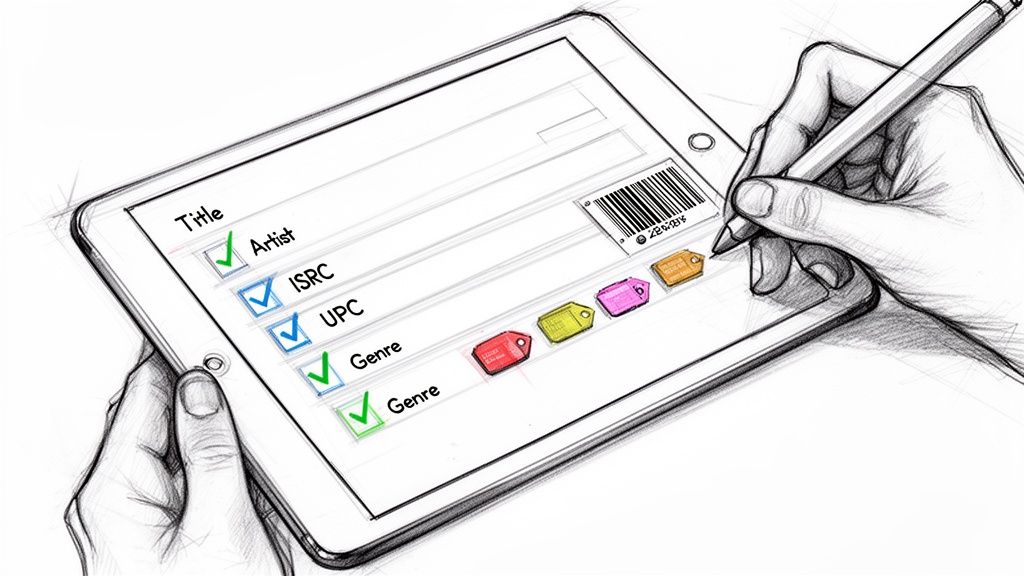
The Unique Fingerprints of Your Music
As you move through your distributor's upload form, you'll run into two acronyms you absolutely need to know: ISRC and UPC. These codes are non-negotiable for any official release.
ISRC (International Standard Recording Code): This is a unique 12-character code for a specific recording. That means the album version, the radio edit, and the instrumental all get their own unique ISRC. It’s like a serial number for each master track.
UPC (Universal Product Code): This is the classic barcode for the entire product. If you're dropping a single, the UPC covers that one track. If it's an album with 12 songs, one UPC covers the whole project.
The good news? You don't have to go out and buy these. Pretty much every reputable distributor, including DistroKid and TuneCore, generates these for you automatically and for free. It’s a seamless step, but understanding what these codes are is crucial for tracking your music's journey across the globe.
Detailing Your Credits for Proper Payouts
This is where so many independent artists trip up. You have to be meticulous and list every single person who contributed to creating the song. This goes way beyond just the performing artist's name.
Your distributor will need detailed songwriter information, including full legal names and ownership percentages (the "splits"). If you co-wrote a song with two other people and agreed to an even split, you’d each get 33.33%. This data is exactly what Performance Rights Organizations (PROs) like ASCAP and BMI use to pay out publishing royalties.
Getting your metadata right isn't just an administrative task—it's the mechanism that ensures you and your collaborators get paid fairly for your work. An error here can cost you thousands in lost royalties over the lifetime of a song.
For a deeper dive into this complex world, check out our essential guide to music metadata. It breaks down every field you'll need to fill out.
The Strategic Importance of Your Release Date
Okay, let's talk timing. When your distributor asks you to set a release date, it’s tempting to pick the earliest date possible to get your music out into the world. Don't do it. This is a classic rookie mistake.
The single most important piece of advice here is to set your release date 4-6 weeks in the future.
This isn't an arbitrary window. It’s your golden opportunity for two mission-critical activities:
Pitching to Spotify Editorial Playlists: You can only submit your song for consideration by Spotify’s official editors after it's been delivered by your distributor but before the public release date. A four-week buffer is perfect for claiming your Spotify for Artists profile and crafting a killer pitch.
Building Pre-Release Hype: This window gives you time to run a proper pre-save campaign, tease the track on social media, and coordinate with any blogs or influencers. A solid marketing runway builds anticipation, making sure you have an audience ready and waiting on day one.
Rushing a release is one of the biggest missed opportunities for an indie artist. Plan ahead. It gives your song the best possible shot at making a real impact.
Unlocking Spotify for Artists and Pitching Playlists
Once your distributor gets your music into Spotify's system, the real work begins. Your next move is to get verified and take the keys to your Spotify for Artists account—your command center for everything on the platform.
Here's a pro tip: don't wait for your song to go live. Claiming your profile during that crucial 4-6 week pre-release window is a non-negotiable step. Waiting is one of the biggest rookie mistakes you can make.
Getting access is pretty simple. Your distributor will shoot you a unique URI code for your upcoming track. You’ll use that code to request access. Once Spotify gives you the green light, you’ve unlocked a whole suite of tools to manage how the world sees you. Think of it less as an admin task and more as laying the foundation for your brand on the biggest audio stage in the world.
Customizing Your Artist Profile
An empty artist profile is a dead end for potential fans. Your first job after getting verified is to make it look professional and give people a reason to stick around. You're building an experience that tells your story.
Here’s what you need to tackle right away:
Artist Bio: You've got 1500 characters to tell your story. Don't just list achievements. Talk about what drives you, your creative process, your influences—make it personal.
Canvas Videos: These short, looping videos are gold. A great Canvas can seriously boost track shares and keep listeners engaged way longer than static artwork.
Artist Pick: This is prime real estate at the top of your profile. Pin your new single, a playlist you're featured on, or your upcoming tour dates. Direct people's attention where you want it.
Profile Image and Header: Use high-res, professional photos that match your vibe. Consistency across your socials and Spotify is key to building a recognizable brand.
Crafting the Perfect Playlist Pitch
Okay, your profile is looking sharp. Now for the main event: pitching your unreleased track directly to Spotify's editorial team. This is your single best shot at landing on career-making playlists like New Music Friday, Lorem, or a niche genre list that can blow up your stream count overnight.
The pitch form looks simple, but every word counts. You have to tell a compelling story about your track in just a few hundred characters. Your goal is to give the editors all the context they need to understand your music and where it belongs.
A killer pitch goes beyond describing the song's sound. It's about the emotion, the story behind it, and the marketing plan you have ready to go. Editors want to see artists who are hustling for their own success.
To make your pitch stand out, get specific. Instead of "it's an upbeat indie pop song," talk about the vintage synth you used or the real-life breakup that inspired the lyrics. Mention any blog features, influencer campaigns, or music videos you have lined up. This shows an editor that putting you on their playlist is a good investment because you're already putting in the work.
Here is an example of the artist.tools dashboard, which has features built to help with this exact process.
The screenshot shows a clean interface where you can access tools like our AI Editorial Pitch Generator, helping you craft the perfect submission.
For a serious advantage, specialized tools are the way to go. You can use the artist.tools AI Editorial Pitch Generator before you even log into Spotify for Artists. It analyzes hundreds of successful pitches to create compelling narratives designed to catch an editor's eye. It also helps you target the right playlists—the ones that drive over 30% of streams for major hits, according to Music Business Worldwide. This kind of data-driven approach takes the guesswork out of the equation and helps you tell your story in a language curators understand.
Promoting Your Release and Tracking Its Performance
Hitting that final "submit" button at your distributor feels incredible, doesn't it? But here’s the reality: that’s just the starting line. A successful release doesn't just happen. It’s built, piece by piece, with a smart promotional strategy that kicks in long before release day.
The moment your song is approved and you have a release date, your hat changes. You switch from creator to promoter. This is when the real work of building momentum begins—the work that separates a track that sinks from one that swims.
Building Pre-Release Momentum
That window of time before your song is public is pure gold. It’s your chance to build hype and get your audience leaning in, ready to pounce. The single most powerful tool you have here is a Pre-Save campaign.
A Pre-Save link lets your fans save your song to their library before it's even out. On release day, it magically appears in their collection, driving an instant burst of streams. This initial spike is a huge signal to Spotify's algorithm that people care about your track.
Think of this period as your pre-launch checklist:
Get a Pre-Save link live. Use a service like Hypeddit or Feature.fm and plaster it everywhere—your social bios, your stories, everywhere.
Create a content calendar. Plan out your teasers, behind-the-scenes clips, and a countdown to build excitement.
Start hitting up independent playlist curators. This is your ground game, moving beyond Spotify's official channels to connect with tastemakers who have loyal followings.
But finding the right independent playlists can feel like navigating a minefield. A lot of them are loaded with bots that generate fake streams, which is a fast track to getting your music flagged or even pulled down by Spotify.
I see so many artists make this mistake: they chase playlists with massive follower counts. A playlist with 5,000 real, engaged listeners is worth infinitely more than one with 100,000 fake followers. Quality over quantity, always.
This is exactly why you need specialized tools in your corner. With the artist.tools Playlist Search, you can slice through the noise and find legit, genre-specific playlists. We analyze historical data to help you spot healthy lists and dodge the botted ones, giving you a direct line to curators who can actually make a difference.
To help you stay on track, here’s a simple checklist you can follow for every release.
Release Promotion Checklist
This timeline breaks down the key promotional tasks to give your song the best possible launch and sustained momentum.
Timeline | Task | Tool to Use |
|---|---|---|
4-6 Weeks Out | Submit to distributor & schedule release. | Your Distributor (e.g., DistroKid, TuneCore) |
3-4 Weeks Out | Set up a pre-save campaign link. | Hypeddit, Feature.fm |
3-4 Weeks Out | Claim Spotify for Artists & pitch to Editorial playlists. | Spotify for Artists, artist.tools AI Pitch Generator |
2-3 Weeks Out | Start social media teaser campaign (artwork, snippets). | Instagram, TikTok, etc. |
1-2 Weeks Out | Pitch to independent playlist curators. | artist.tools Playlist Search |
Release Week | Push pre-save link heavily. Announce countdown. | All social media channels |
Release Day | GO LIVE! Share direct Spotify link, update bios. | All social media channels |
Post-Release | Monitor initial streams & playlist adds. | artist.tools Stream Tracker, Spotify for Artists |
Post-Release | Identify & remove any botted playlist placements. | artist.tools Bot Detection |
Ongoing | Analyze performance data to inform the next release. | Spotify for Artists, artist.tools Royalties Calculator |
Following a structured plan like this takes the guesswork out of promotion and ensures you're not missing any crucial steps.
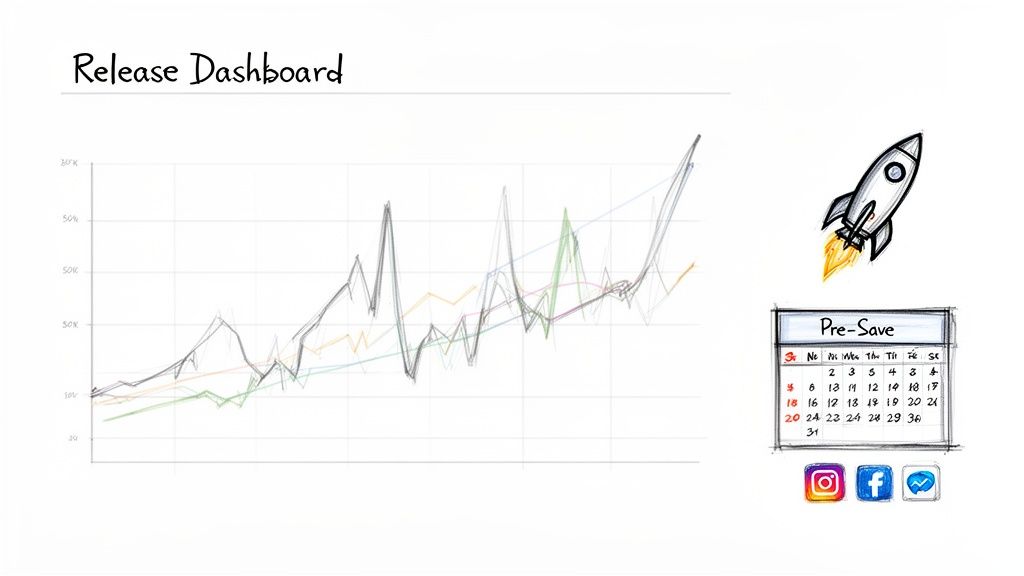
Analyzing Your Post-Release Data
Once your song is out in the world, the game changes from promotion to analysis. You need to know what’s working. Your Spotify for Artists dashboard is your mission control, showing you listener demographics, stream sources, and playlist adds.
But Spotify’s data can lag by 24-48 hours. For real-time feedback on your hard work, you need something faster.
The artist.tools Stream Tracker gives you an up-to-the-minute look at your song's performance. You can see the immediate lift from a social post or a new playlist add, allowing you to double down on what’s actually driving growth. We break down more advanced strategies in our guide on tracking a song on Spotify.
This matters because every stream counts, literally. Spotify requires tracks to get at least 1,000 streams within a 12-month period to even be eligible for royalties. And get this: a staggering 99.5% of all streams go to tracks that clear this bar, as reported by Music Business Worldwide. Every promotional push gets you closer to getting paid.
Refining Your Strategy for Future Releases
Every single release is a lesson. The data you gather isn't just about this one song; it's the blueprint for your next one. By digging into your performance, you start answering the big questions that will shape your career.
Which specific playlists drove the most saves and repeat listeners?
What kind of social media post got the most clicks on your Pre-Save link?
Where in the world are your fans actually listening from?
This is how you get smarter with every release. See a spike from a city in Brazil? Target that area with ads next time. Did a lo-fi study playlist perform unexpectedly well? Use the artist.tools Playlist Search to find ten more just like it. After you upload my music to spotify becomes a routine, this data-driven process is what separates artists who grow from those who just stay put.
Common Questions About Uploading to Spotify
Once you hit "submit" on your new release, the questions usually start popping up. Even seasoned artists run into the same handful of issues time and time again. What happens now? How long does it really take? What if I made a mistake?
Let’s cut through the noise and get you some straight answers. Think of this as your go-to troubleshooting guide for the most common hurdles you'll face after uploading your music.
How Long Does It Take for My Music to Go Live?
This is the big one, and the honest answer is: it depends entirely on your distributor. After you upload your release, it doesn't just magically appear on Spotify. First, it lands in your distributor's review queue. Their team has to manually check your audio, artwork, and all the metadata to make sure everything lines up with Spotify’s rules.
This initial review can take anywhere from a couple of days to a full week, especially during busy release periods. Only after your distributor approves it do they send it over to Spotify. From that point, Spotify's own ingestion process usually takes another 2-5 business days.
To be safe, always plan for a minimum of one full week from the moment you submit to your music actually appearing on the platform. This is exactly why we hammer home the 4-6 week lead time. It gives you a much-needed buffer for unexpected hiccups.
What Are the Typical Costs to Upload Music?
You don't pay Spotify directly to upload your music. Instead, you pay a distributor to do it for you, and their pricing models are all over the map. What’s "typical" really comes down to how often you plan on releasing music.
Here’s a quick look at the most common ways they charge:
Annual Subscription: This is the DistroKid model. You pay a flat yearly fee (starting around $23) for unlimited uploads. It’s a no-brainer if you're consistently dropping new tracks.
Per-Release Fee: Companies like CD Baby charge a one-time fee for each single or album (starting around $10). This works well if you only release music once or twice a year and want to avoid a recurring subscription.
Commission-Based: Some distributors offer "free" uploads but will take a cut of your royalties instead, often somewhere around 15%.
Watch out for the hidden costs, too. Things like YouTube Content ID, licensing for cover songs, or adding your music to new stores down the road can sometimes come with extra fees.
Can I Fix a Mistake After My Song Is Released?
Yes, but it's a pain and it isn't fast. Whether you spotted a typo in a song title, need to fix songwriter credits, or want to swap in an updated master, the process is the same: you have to submit an edit request through your distributor.
Once you send that request, your distributor has to process the changes and redeliver the corrected files or metadata to Spotify. This whole cycle can take anywhere from a few days to several weeks to actually update on your profile. This is why you need to double, then triple-check everything before you hit that final submit button. It will save you a massive headache later.
What Should I Do About Suspected Bot Activity?
Waking up to a sudden, massive jump in streams feels great for about five seconds—until you realize it’s probably bot activity. Artificial streaming is a huge problem that can get your music kicked off playlists or, in a worst-case scenario, removed from Spotify entirely.
If you think your track is being targeted by bots, here's what to do immediately:
Don’t engage. If you paid some sketchy third-party promo service that promised "guaranteed plays," cut off all contact.
Tell your distributor right away. Open a support ticket and let them know you suspect fraudulent streams. They are your direct line to Spotify's support team.
Screenshot everything. Go into your Spotify for Artists dashboard and document the unusual spikes, the stream sources, and anything else that looks off.
Honestly, your best defense here is being proactive. This is where a tool like artist.tools' Bot Detection becomes your insurance policy. It can help you scan your profile for signs of fake streams and spot toxic playlists before they do any real damage to your account's standing with Spotify.
Ready to take control of your Spotify strategy? artist.tools gives you the data and insights you need to find the right playlists, craft the perfect pitch, detect harmful bot activity, and track your performance in real-time. Stop guessing and start growing at https://artist.tools.
.png)
Comments